Kubernetes has a reputation for being complicated. A lot of that is just new vocabulary — a wall of unfamiliar words that feels intimidating the first time you hear it. In this post I’ll try to explain what all that vocabulary actually means in simple terms, and hopefully by the end you’ll understand, at a high level, what Kubernetes does. No setup, no YAML, no commands — just the mental model.
1. The cluster: one brain, many machines
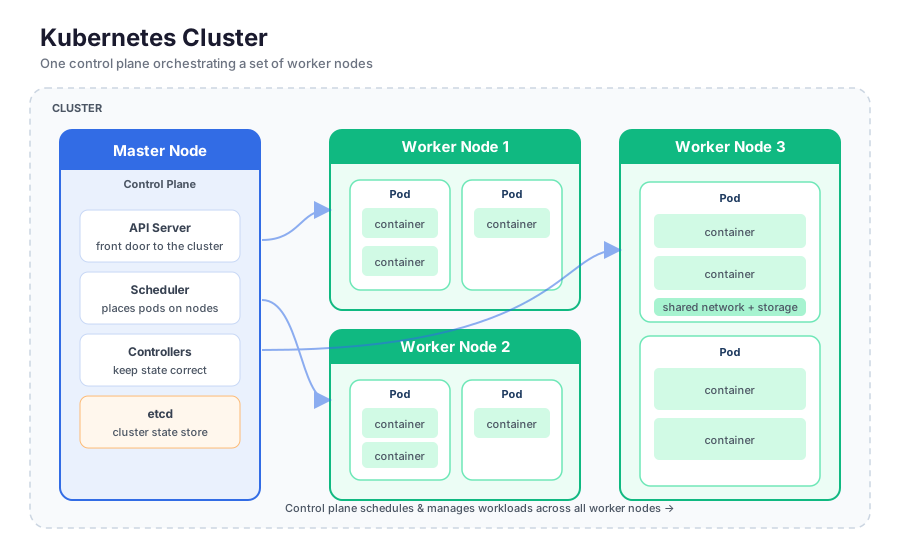
A Kubernetes cluster is just a group of machines working together — nothing more exotic than that. A node is a machine (physical or virtual). These machines are split into two roles: the master node is the brain that makes decisions, and the worker nodes are the machines that actually run your apps.
Your app runs inside a container, and containers are grouped into a pod — the smallest thing Kubernetes deploys. A pod is one or more containers that share the same network address and storage. Pods live on the worker machines.
The core idea: you describe the state you want, and Kubernetes figures out how to make it happen.
2. Inside the master node: who decides what
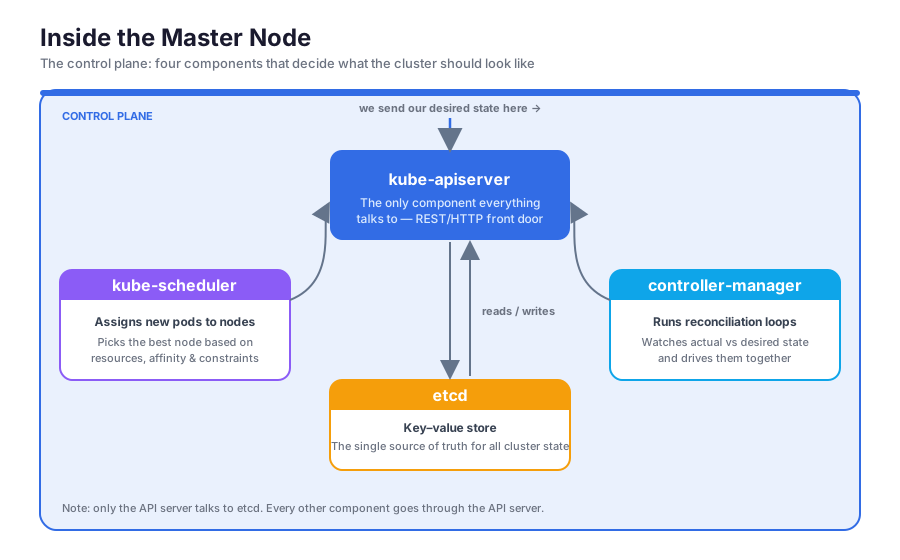
The control plane — everything running on the master node — has four pieces.
API server — a general API server we can talk to over HTTP. We send it requests describing our desired state (“I want 3 copies of this app running”), and Kubernetes takes care of how to actually make that happen. It’s also the one component everything else talks through — nothing skips it.
etcd — just a database. It stores the whole cluster state: what we asked for and what currently exists. Only the API server talks to this database; everything else goes through the API server to reach it.
Scheduler — decides which machine each new pod should run on, based on available CPU/memory and other constraints. It makes the placement decision and hands it back to the API server.
Controllers — run constant loops comparing what we asked for against what actually exists, and fix any gaps. If a machine dies and a pod disappears, a controller notices and arranges a replacement. This “keep reality matching the desired state” loop is what makes Kubernetes self-healing.
3. Inside a worker node: where work happens
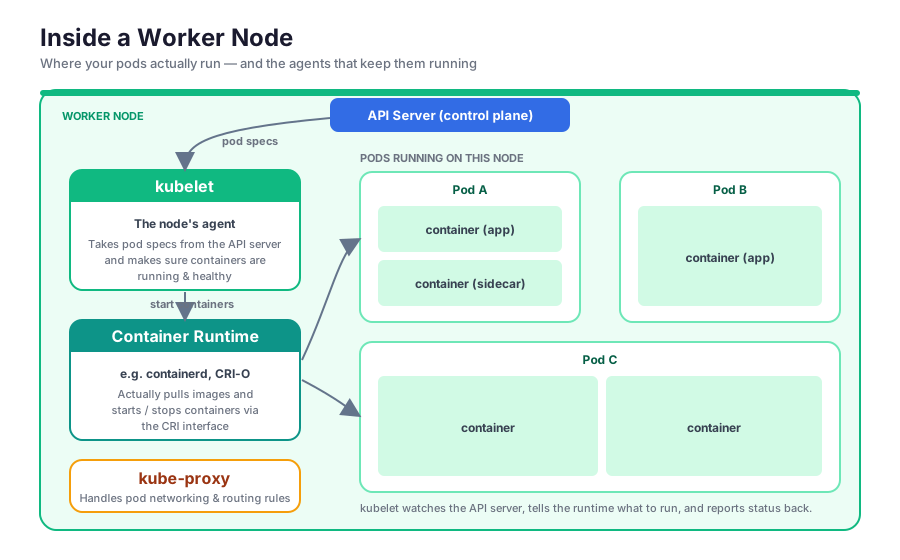
kubelet — the agent running on each worker machine. It checks the API server for pods assigned to its machine, makes sure those containers are actually running and healthy, and reports status back.
Container runtime — the piece that does the real work of pulling images and starting/stopping containers (e.g. containerd or CRI-O). kubelet tells it what to run; the runtime runs it.
kube-proxy — sets up the networking rules on the machine so pods can reach each other.
Putting it together
The whole flow, start to finish:
- We send our desired state to the API server.
- The scheduler and controllers decide what should run where.
- kubelet on each worker machine picks up its assignments.
- The container runtime starts the containers.
- Status flows back — up through kubelet to the API server, into etcd.
That loop, running continuously, is Kubernetes. This is the architecture of Kubernetes in a nutshell. And the beautiful part is that as users of Kubernetes, we just talk to the API server — we describe what we want, and all the rest of the complexity is handled by Kubernetes for us.
In Part 2 we’ll go one level deeper and learn about pods, ReplicaSets, and deployments — the objects you actually use to describe that desired state.