In Part 1 we built the mental model: a cluster is a group of machines, the master node decides, the worker nodes run your apps, and everything works by you describing a desired state and Kubernetes making it happen. Now it’s time to actually describe that state. In this part we’ll get our hands dirty with the three objects you’ll use constantly — pods, ReplicaSets, and Deployments. No cloud account needed; everything runs on your laptop.
1. Kind: a whole cluster on your laptop
To practice, we need a cluster. Renting machines from a cloud provider just to learn would be overkill, so we’ll use Kind (short for Kubernetes in Docker). The trick behind Kind is simple: remember that a node is just a machine? Kind fakes each machine with a Docker container. So a “3-node cluster” is really just 3 Docker containers running on your laptop, each one pretending to be a full machine with kubelet, a container runtime, and everything else a node needs.
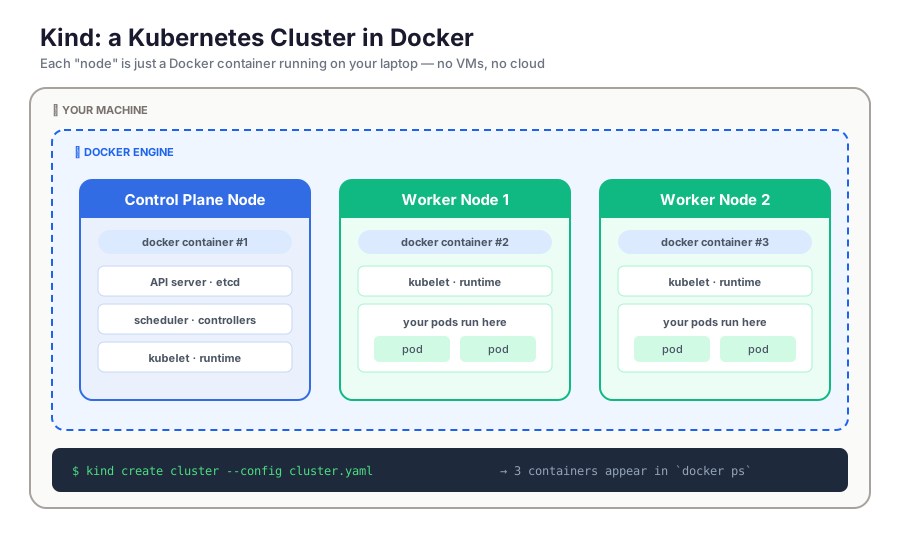
You’ll need Docker running, plus two tools: install Kind and install kubectl (more on what that is in a moment). Both pages have simple instructions for mac and windows.
By default Kind creates a single-node cluster, but we want something that looks like Part 1’s picture: one master and two workers. Kind takes a config file for that. Create cluster.yaml:
kind: Cluster
apiVersion: kind.x-k8s.io/v1alpha4
nodes:
  - role: control-plane
  - role: worker
  - role: worker
Then create the cluster:
kind create cluster --name learning --config cluster.yamlAfter a minute or two, the cluster is up. If you run docker ps you’ll see the trick — three containers, one per “machine”.
2. kubectl: how we talk to the API server
We have a cluster — now what? Remember from Part 1: as users, the only thing we ever talk to is the API server on the master node, and it’s just an HTTP server. So can we simply open a URL? Our Kind cluster’s API server is actually listening on your machine right now, at an address like https://127.0.0.1:56443. But if you paste that into a browser or curl it, you’ll get an error like this:
{
  "kind": "Status",
  "status": "Failure",
  "message": "forbidden: User \"system:anonymous\" cannot get path \"/\"",
  "code": 403
}
The API server refuses to talk to strangers — every request must be authenticated, which for our cluster means presenting the right client certificates. When Kind created the cluster, it generated those credentials and saved them (along with the server’s address) into a file: ~/.kube/config.
kubectl is the command-line utility that puts these two pieces together. Every time you run a kubectl command, it reads ~/.kube/config, attaches the credentials, and makes the authenticated HTTP call to the API server for you. That’s all it is — a friendly wrapper around the API server. Let’s use it for the first time to verify our cluster:
kubectl get nodesNAME STATUS ROLES AGE VERSION
learning-control-plane Ready control-plane 2m v1.33.1
learning-worker Ready <none> 90s v1.33.1
learning-worker2 Ready <none> 90s v1.33.1Behind the scenes that was just an authenticated GET request to the API server, which looked up the answer in etcd. One master, two workers — everything from here on is kubectl talking to that API server.
3. Pods: the smallest thing you can deploy
A pod is the smallest unit Kubernetes deploys — you never deploy a bare container, you deploy a pod that wraps one (or occasionally a few) containers. The containers inside a pod share the same IP address and storage, and the pod itself gets its own IP in the cluster.
The quickest way to create one is a single command:
kubectl run nginx --image=nginxCheck on it:
kubectl get podsNAME READY STATUS RESTARTS AGE
nginx 1/1 Running 0 20sThat’s a real nginx web server running inside your cluster. The scheduler picked a worker node for it, kubelet on that node pulled the image and started the container — the whole flow from Part 1, triggered by one command.
Now delete it:
kubectl delete pod nginxSo why doesn’t everyone just use kubectl run? Because a command line is a terrible place to describe anything complicated. Real pods have ports, environment variables, resource limits, volumes — cramming all that into flags gets ugly fast, and worse, there’s no record of what you did. The Kubernetes way is to write the desired state down in a manifest — a YAML file you can save, review, put in git, and apply again on any cluster. This is the “describe what you want” idea from Part 1 made concrete: the file is the desired state.
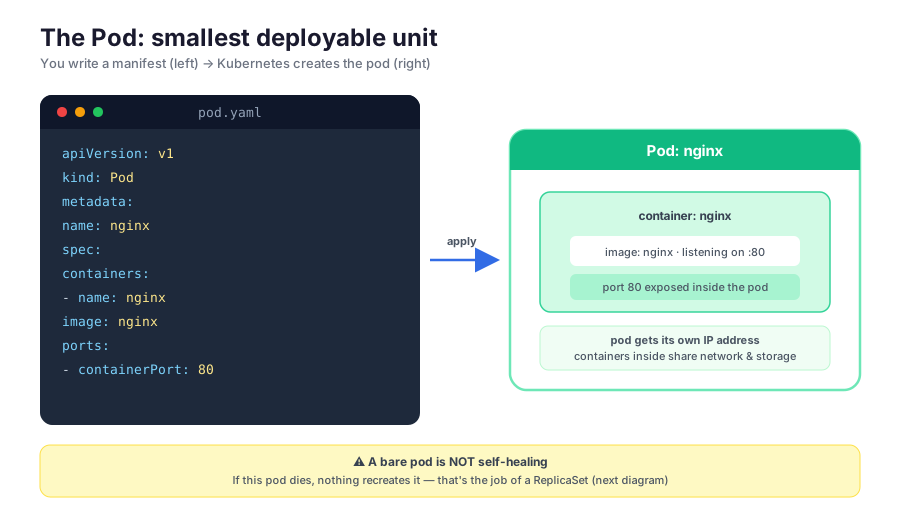
Here’s the same pod as a manifest, pod.yaml:
apiVersion: v1
kind: Pod
metadata:
  name: nginx
spec:
  containers:
    - name: nginx
      image: nginx
      ports:
        - containerPort: 80
Every manifest has the same four parts: apiVersion (which version of the API this object belongs to), kind (what type of object), metadata (its name and labels), and spec (the actual desired state). Apply it with:
kubectl apply -f pod.yamlSame result as kubectl run, but now it’s written down. From here on, everything we create will be a manifest.
One important catch, called out at the bottom of the diagram: a bare pod is not self-healing. If this pod crashes or its node dies, nothing brings it back. The self-healing magic from Part 1 comes from controllers — and the controller whose job is to keep pods alive is the ReplicaSet. Delete this pod before moving on:
kubectl delete pod nginx4. ReplicaSets: keep N copies alive
A ReplicaSet is a controller with one job: make sure a given number of copies (replicas) of a pod are always running. You tell it “I want 3 pods matching this description”, and it runs the classic Kubernetes loop forever: count the matching pods, compare with the desired number, fix the gap. Pod crashes? It starts a replacement. Somehow there are 4? It kills one.
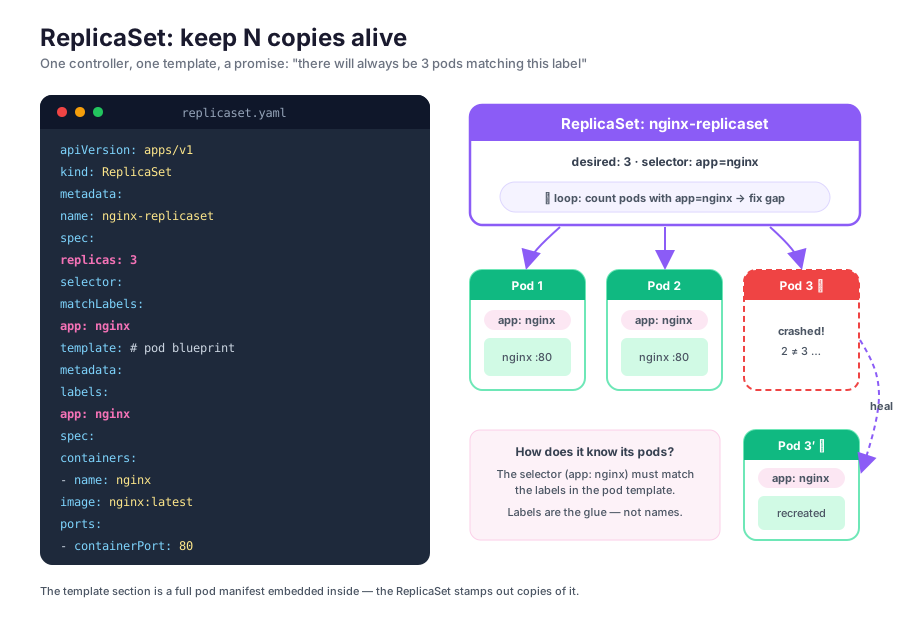
Here’s the manifest from the diagram, replicaset.yaml:
apiVersion: apps/v1
kind: ReplicaSet
metadata:
  name: nginx-replicaset
spec:
  replicas: 3
  selector:
    matchLabels:
      app: nginx
  template:
    metadata:
      labels:
        app: nginx
    spec:
      containers:
        - name: nginx
          image: nginx:latest
          ports:
            - containerPort: 80
The spec has three pieces worth understanding:
replicas— how many copies you want. That’s the promise the ReplicaSet keeps.template— look closely and you’ll recognize it: it’s a full pod manifest embedded inside (metadata + spec, just nokindorname— the ReplicaSet generates names). This is the blueprint it stamps copies from.selector— how the ReplicaSet knows which pods are its pods. It doesn’t track them by name; it counts every pod whose labels match the selector. That’s whyapp: nginxappears twice — once in the selector, once in the template’s labels — and they must match. Labels are the glue.
Apply it and watch:
kubectl apply -f replicaset.yaml
kubectl get pods
NAME READY STATUS RESTARTS AGE
nginx-replicaset-8tkx7 1/1 Running 0 15s
nginx-replicaset-lp2gd 1/1 Running 0 15s
nginx-replicaset-vw9qn 1/1 Running 0 15sWant to see those labels in action? kubectl describe shows the full details of any object — pick one of your pods:
kubectl describe pod nginx-replicaset-8tkx7Name: nginx-replicaset-8tkx7
Namespace: default
Node: learning-worker/172.18.0.3
Labels: app=nginx
Controlled By: ReplicaSet/nginx-replicaset
...There it is: the app=nginx label the pod inherited from the template, and Controlled By telling you exactly which ReplicaSet claimed it through that label. describe works on anything (kubectl describe rs nginx-replicaset, kubectl describe node learning-worker) and is your first stop whenever you’re wondering what’s going on with an object.
Now the fun part — try to break it. Delete one of the pods (use one of your pod names):
kubectl delete pod nginx-replicaset-8tkx7
kubectl get pods
A brand new pod appears within seconds. The count dropped to 2, the controller saw 2 ≠ 3, and it fixed the gap. This is the self-healing we talked about in Part 1, and now you’ve watched it happen.
Clean up with kubectl delete rs nginx-replicaset — deleting the ReplicaSet takes its pods down with it.
5. Deployments: ReplicaSets with superpowers
Here’s the thing though: you’ll almost never write a ReplicaSet directly. A ReplicaSet is great at keeping N copies alive, but it has a blind spot — updates. Change the image in your ReplicaSet from nginx:1.24 to nginx:1.25 and re-apply… and nothing happens to the running pods. The template is only used when creating pods, and 3 pods already exist. You’d have to kill the pods yourself to get new ones.
A Deployment fixes this by sitting one level above: a Deployment manages ReplicaSets, which manage pods. The manifest looks almost identical — take the ReplicaSet YAML and change one line, kind: Deployment (and the name). Save it as deployment.yaml:
apiVersion: apps/v1
kind: Deployment
metadata:
  name: nginx-deployment
spec:
  replicas: 3
  selector:
    matchLabels:
      app: nginx
  template:
    metadata:
      labels:
        app: nginx
    spec:
      containers:
        - name: nginx
          image: nginx:latest
          ports:
            - containerPort: 80
kubectl apply -f deployment.yamlThe difference shows up the moment you change something. Update the image version in the file and re-apply, and the Deployment performs a rolling update: it creates a new ReplicaSet for the new version and gradually scales it up while scaling the old one down — one pod at a time, so your app never goes fully offline.
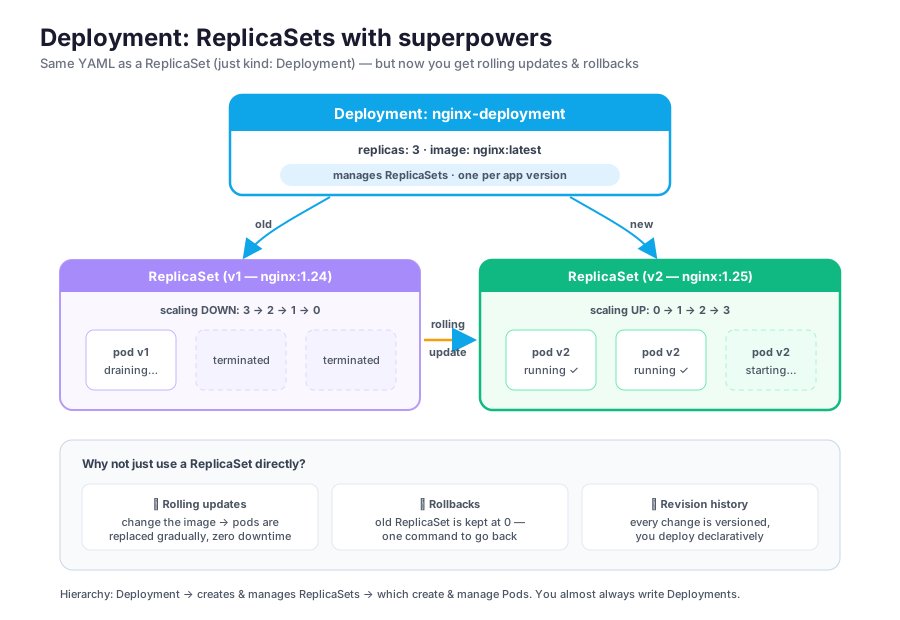
So compared with using a ReplicaSet directly, a Deployment gives you:
- Rolling updates — change the image, re-apply, and pods are replaced gradually with zero downtime. No manual pod killing.
- Rollbacks — the old ReplicaSet isn’t deleted, just scaled to 0. If the new version is broken,
kubectl rollout undo deployment/nginx-deploymentscales the old one right back up. - Revision history — every change creates a new revision (
kubectl rollout history deployment/nginx-deploymentshows them), so your deploys are versioned and declarative.
The hierarchy to remember: Deployment → creates and manages ReplicaSets → which create and manage Pods. In practice you write Deployments, and the ReplicaSets underneath are an implementation detail you mostly just observe with kubectl get rs.
Clean up with kubectl delete deployment nginx-deployment — it removes the Deployment, its ReplicaSets, and their pods in one go.
Wrapping up
We covered a lot of ground, and it all stacks neatly:
- Kind gave us a real multi-node cluster using nothing but Docker containers.
- kubectl is how we talk to the API server — it reads the address and credentials from
~/.kube/configand makes authenticated HTTP calls for us. - A pod is the smallest deployable unit — but a bare pod won’t come back if it dies.
- A ReplicaSet keeps N copies of a pod alive, using labels to know which pods are its own.
- A Deployment manages ReplicaSets, adding rolling updates, rollbacks, and revision history — which is why it’s the object you’ll actually write day to day.
When you’re done experimenting, kind delete cluster --name learning cleans everything up.
There’s one obvious gap: we have 3 nginx servers running, but no way to actually visit them in a browser — pod IPs are internal to the cluster, and they change every time a pod is replaced. In Part 3 we’ll fix that with Services — how to expose pods, and how networking in Kubernetes actually works.