At the end of Part 2 we had nginx running in our cluster with no way to actually visit it in a browser. Pods get IP addresses, but those IPs have two fatal problems: they’re internal to the cluster, and they change every time a pod is replaced — which, as we learned, happens all the time. The fix for both is a Service: a stable network address that sits in front of pods and routes traffic to them.
There are three Service types you’ll use, and this post walks through all of them: NodePort, LoadBalancer, and ClusterIP. To see them properly, though, we need to change one thing about our setup first.
1. Moving from Kind to a real cloud cluster
Kind was perfect for Part 2, but it has a limitation that matters now: its “nodes” are Docker containers on your laptop, so they have no public IP addresses — nothing on the internet can reach them. And the LoadBalancer service type literally asks your cloud provider to create a load balancer, so with no cloud provider, there’s nobody to ask. To learn Services in their natural habitat, we need real machines.
Any managed Kubernetes offering works the same way — GKE on Google Cloud, EKS on AWS, AKS on Azure. I’ll use DigitalOcean because it’s the simplest and among the cheapest for a throwaway learning cluster. In the DigitalOcean control panel, create a Kubernetes cluster and give its node pool 3 nodes (the smallest size is fine). After a few minutes you get a running cluster and a button to download the config file.
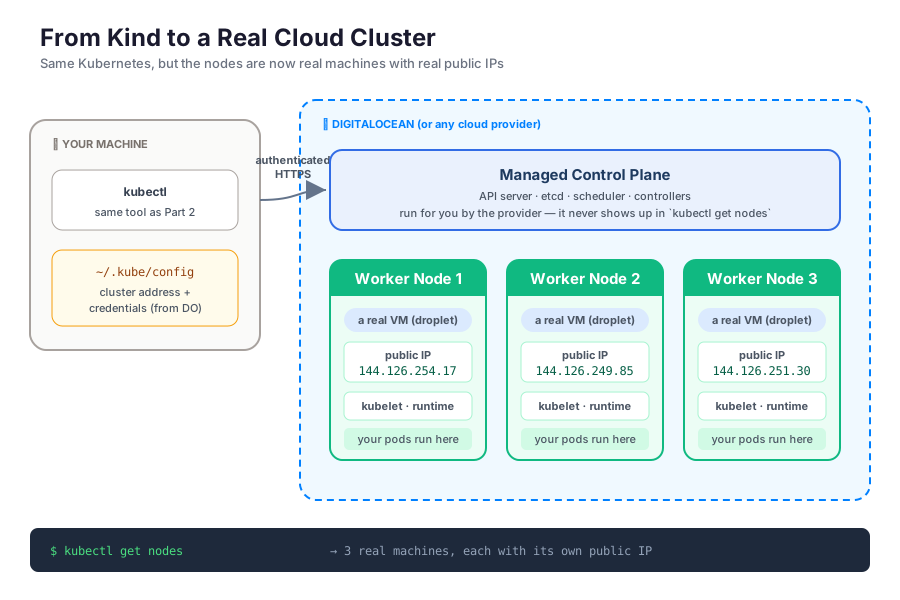
That file should look familiar — it’s the same kind of kubeconfig that Kind generated in Part 2: the API server’s address plus credentials. Copy it to where kubectl looks:
cp ~/Downloads/k8s-learning-kubeconfig.yaml ~/.kube/configThat’s the entire switch. kubectl doesn’t know or care that the cluster moved from your laptop to a datacenter — it just reads ~/.kube/config and makes authenticated HTTP calls to whatever API server is in there.
Verify it works:
kubectl get nodesNAME STATUS ROLES AGE VERSION
pool-l9pri6ike-cd5nq Ready <none> 10m v1.33.1
pool-l9pri6ike-cd5nr Ready <none> 10m v1.33.1
pool-l9pri6ike-cd5ns Ready <none> 10m v1.33.1Notice something? Only 3 worker nodes — no master. That’s the “managed” in managed Kubernetes: the provider runs the control plane (API server, etcd, scheduler, controllers) for you on machines you never see. You just get workers. Everything from Part 1 still exists; you’re just not paying attention to it anymore.
Now let’s give the Services something to route to. Same nginx pod as Part 2, with one detail that matters: the label. Save this as pod.yaml and apply it:
apiVersion: v1
kind: Pod
metadata:
  name: nginx
  labels:
    app: nginx
spec:
  containers:
    - name: nginx
      image: nginx
      ports:
        - containerPort: 80
kubectl apply -f pod.yaml(In real life this would be a Deployment, for all the reasons in Part 2 — but a Service doesn’t care where pods come from. It finds them by labels, exactly like a ReplicaSet does. One pod keeps our picture simple.)
2. NodePort: open the same port on every node
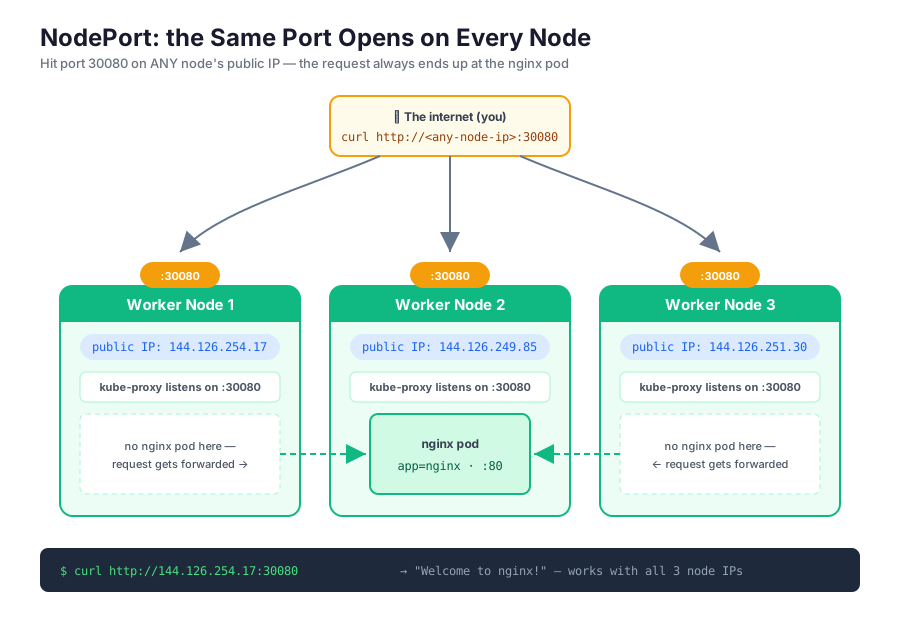
The first way to expose a pod is a NodePort service. The idea: pick a port (from the range 30000–32767), and Kubernetes opens that port on every node in the cluster. Any request arriving at any node on that port gets forwarded to your pod — even if the pod lives on a different node.
Save this as nodeport.yaml:
apiVersion: v1
kind: Service
metadata:
  name: nginx-nodeport
spec:
  type: NodePort
  selector:
    app: nginx
  ports:
    - port: 80
      targetPort: 80
      nodePort: 30080
Two parts worth understanding:
selector— labels again, same glue as in Part 2. Every pod labelledapp: nginxbecomes part of this service’s pool — that’s how it finds our pod, and why we gave the pod that label. Note one syntax difference from Part 2: nomatchLabelshere. Services use a simpler selector — just a plain map of labels — while the richermatchLabelsform belongs to ReplicaSets and Deployments. Same concept, slightly different spelling. To be precise about what happens to a request: it’s delivered to exactly one pod from the pool, not to all of them. We only have one nginx pod, so there’s no choice to make — but if you scaled to 3 pods (say, with a Deployment), kube-proxy would pick one pod per connection, effectively at random, spreading traffic evenly across the three. In other words, a Service isn’t just a stable address — it’s also a built-in load balancer across whatever pods match its selector.- The three ports — reading from outside in:
nodePort: 30080is the port opened on every node,port: 80is the service’s own port, andtargetPort: 80is the container’s port the traffic is finally delivered to. Ifportlooks useless here — we only ever hit the node port — it isn’t: every service, whatever its type, also gets an internal cluster IP (more on that in section 4), andportis what that IP listens on. It’s actually the only port field the API requires;targetPortdefaults toportif omitted, andnodePortgets auto-assigned from the 30000–32767 range if you don’t pin one. We pin it only so the URLs in this post are predictable.
Apply it:
kubectl apply -f nodeport.yamlNow we need a node’s public IP. kubectl describe node shows the full details of a node, including its addresses — use one of your node names:
kubectl describe node pool-l9pri6ike-cd5nqName: pool-l9pri6ike-cd5nq
...
Addresses:
InternalIP: 10.122.0.2
ExternalIP: 144.126.254.17
Hostname: pool-l9pri6ike-cd5nqThere it is — ExternalIP is the node’s real public IP, because this node is a real machine on the internet now. Open http://144.126.254.17:30080 in your browser (your IP will differ), or curl it:
curl http://144.126.254.17:30080<h1>Welcome to nginx!</h1>Our pod is on the internet. But here’s the part that makes NodePort interesting: it doesn’t matter which node you ask. Grab the ExternalIP of the other two nodes and try those — same port, same nginx page. Our pod is running on exactly one node, yet all three answer. That’s kube-proxy at work (the worker-node component from Part 1): it listens on port 30080 on every node, and when a request lands on a node that doesn’t have the pod, it forwards it across the cluster’s internal network to one that does.
So why isn’t this the final answer? Think about what you’d tell your users: “visit port 30080 on the IP of any of my nodes.” Which IP? Nodes get replaced during upgrades and their IPs change. And ports 30000–32767 are nobody’s idea of a friendly URL. NodePort is a building block, not a front door. For a real front door, you want the next type.
Clean up before moving on:
kubectl delete service nginx-nodeport3. LoadBalancer: one stable IP in front of everything
A LoadBalancer service solves exactly the problems NodePort left us with: it gives you a single, stable, public IP address that isn’t tied to any node. The manifest is almost insultingly simple — save as loadbalancer.yaml:
apiVersion: v1
kind: Service
metadata:
  name: nginx-loadbalancer
spec:
  type: LoadBalancer
  selector:
    app: nginx
  ports:
    - port: 80
      targetPort: 80
Same selector, same ports — the only change is type: LoadBalancer (and no nodePort; one gets picked automatically, more on that in a second). But what happens when you apply it is very different:
kubectl apply -f loadbalancer.yaml
kubectl get services
NAME TYPE CLUSTER-IP EXTERNAL-IP PORT(S) AGE
nginx-loadbalancer LoadBalancer 10.245.156.10 <pending> 80:31245/TCP 15s<pending> is the giveaway that something is happening outside the cluster: Kubernetes has asked DigitalOcean to create an actual load balancer — a separate piece of cloud infrastructure, the same thing you’d get if you clicked “Create Load Balancer” in the control panel yourself. After a minute or two, run kubectl get services again:
NAME                 TYPE           CLUSTER-IP      EXTERNAL-IP     PORT(S)        AGE
nginx-loadbalancer   LoadBalancer   10.245.156.10   164.90.243.88   80:31245/TCP   2m
Open http://164.90.243.88 — no weird port, just a clean IP on port 80 — and there’s nginx. In production you’d point your domain’s DNS at this IP and be done.
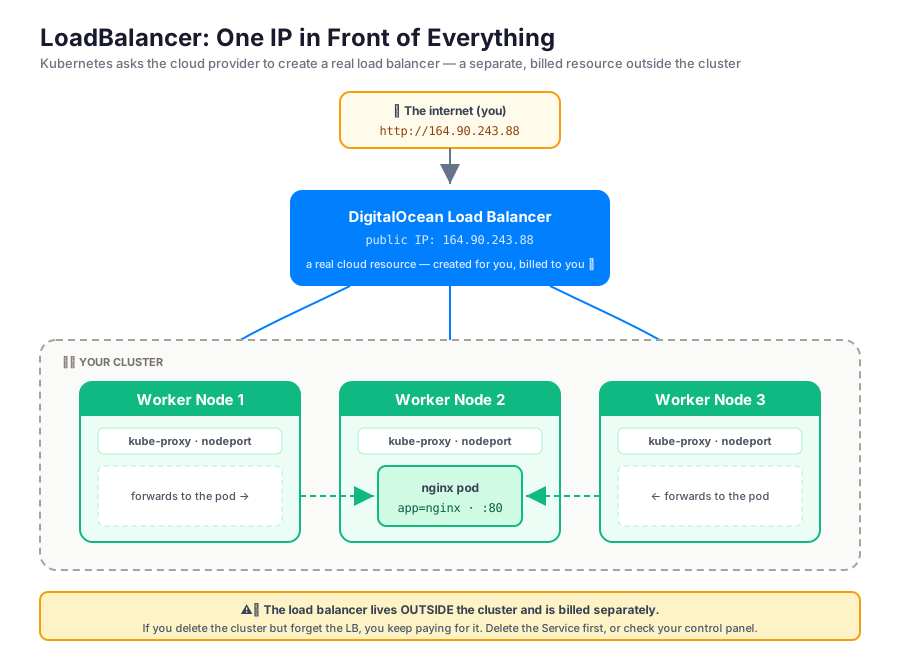
One detail worth noticing in that output: 80:31245/TCP. That second number is a NodePort! A LoadBalancer service is really a NodePort service with a cloud load balancer bolted on in front — the LB receives traffic on port 80 and forwards it to that auto-assigned port on your nodes, and from there it’s the exact same kube-proxy story as before. The Service types stack on top of each other.
⚠️ The load balancer costs real money. It’s a separate resource outside your cluster (~$12/month on DigitalOcean), and it lives in your cloud account, not in etcd. The clean way to remove it is
kubectl delete service nginx-loadbalancer— Kubernetes then tells the provider to tear the LB down. The trap: if you delete the cluster and forget the LB existed, it can be left behind, silently billing you every month for routing traffic to nodes that no longer exist. Whenever you tear down a cluster, check the load balancers page in your provider’s control panel and make sure it’s empty.
4. ClusterIP: services that never touch the internet
So far we’ve been pushing traffic in. But flip the scenario: say you add a Postgres database pod to your cluster. Your api pods need to talk to it constantly — but the internet absolutely should not. Exposing your database on a public IP is how you end up in a data-breach headline. So how do pods reach it?
You might think: pods have IPs, just connect directly. But that’s the same trap from the intro — the database pod’s IP changes every time it’s replaced, and you don’t want to re-configure every api pod when it does. What you want is a stable address that only works inside the cluster. That’s a ClusterIP service.
First, the database pod — save as db-pod.yaml:
apiVersion: v1
kind: Pod
metadata:
  name: postgres
  labels:
    app: postgres
spec:
  containers:
    - name: postgres
      image: postgres:16
      env:
        - name: POSTGRES_PASSWORD
          value: "learning-only"
      ports:
        - containerPort: 5432
And the service — save as db-service.yaml:
apiVersion: v1
kind: Service
metadata:
  name: db
spec:
  type: ClusterIP
  selector:
    app: postgres
  ports:
    - port: 5432
      targetPort: 5432
kubectl apply -f db-pod.yaml -f db-service.yaml
kubectl get servicesNAME TYPE CLUSTER-IP EXTERNAL-IP PORT(S) AGE
db ClusterIP 10.245.241.130 <none> 5432/TCP 12sEXTERNAL-IP: <none> — exactly what we want. The service got a cluster IP: a stable virtual IP that’s only routable inside the cluster. No node port was opened, no load balancer was created; from the internet, this database simply doesn’t exist.
Even better, you don’t have to use the IP. Kubernetes runs an internal DNS, and every service gets a name following this pattern:
<service-name>.<namespace>.svc.cluster.localOur service is named db, and since we didn’t specify a namespace it lives in default, so its full address is db.default.svc.cluster.local — and from a pod in the same namespace, plain db works too. Let’s prove it by launching a temporary pod inside the cluster and connecting to the database by name:
kubectl run tmp --rm -it --image=postgres:16 --restart=Never -- \
  psql -h db.default.svc.cluster.local -U postgres
That’s a dense one-liner, so let’s unpack it. The base is kubectl run tmp --image=postgres:16 — the same quick pod-creation command we used in Part 2, creating a throwaway pod named tmp. We use the postgres:16 image not to run a second database, but because it has the psql client program inside it. The rest of the flags:
--— everything after the double dash is the command to run inside the container instead of its default one. So rather than starting a Postgres server, our pod just runspsql -h db.default.svc.cluster.local -U postgres— a database client connecting to the hostdb.default.svc.cluster.local, our service’s DNS name.-it— attach your terminal to the container, interactively. Without this,psqlwould run somewhere in the cluster and you’d never see its prompt.--rm— delete the pod automatically when the command exits. It’s a scratch pod; we don’t want it lingering around.--restart=Never— run the command once and stop. Without it, Kubernetes would treat an exitingpsqlas a crashed app and keep restarting it.
In short: “spin up a temporary interactive pod in the cluster, run a Postgres client in it pointed at our service’s DNS name, and clean up after yourself.”
Enter the password (learning-only) and you get a live postgres=# prompt — one pod talking to another through a service name, with the actual pod IP a hidden detail.
So what does this look like in a real app? Your api code doesn’t know anything about Kubernetes — it just reads its database address from configuration, usually an environment variable, and you set that variable in the pod’s manifest:
spec:
  containers:
    - name: api
      image: my-api
      env:
        - name: DATABASE_URL
          value: "postgres://postgres:learning-only@db:5432/postgres"
Look at the host in that connection string: just db. There’s nothing Kubernetes-specific about it — to your app it’s an ordinary hostname, no different from localhost or db.example.com. The magic is on the resolving side: when the app looks up db, the cluster’s DNS is configured to first search the pod’s own namespace, so db expands to db.default.svc.cluster.local and resolves to the service’s cluster IP. You could absolutely write the full name in the URL instead — same result. Most people use the short name within a namespace and the full name only when reaching a service in a different namespace. Either way, the address never mentions a pod IP, which is exactly why it keeps working no matter how many times the database pod is rescheduled.
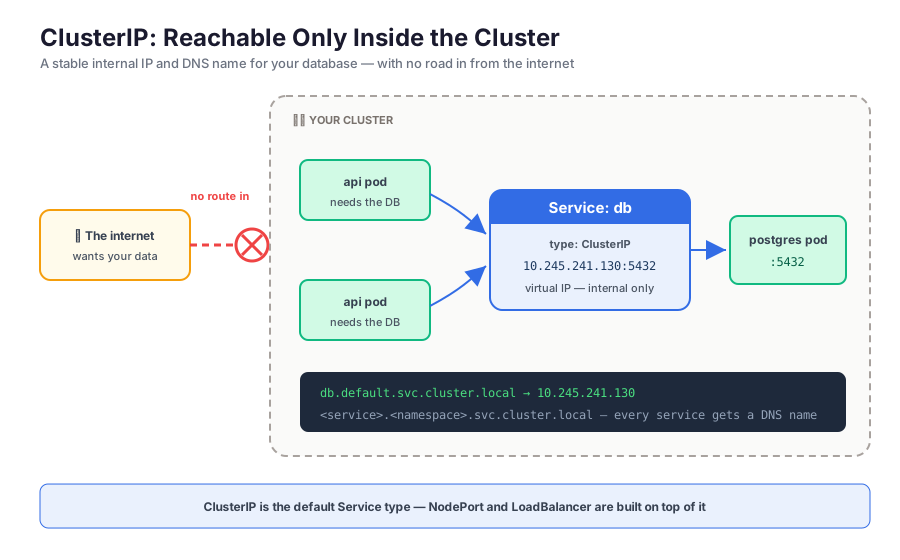
And here’s the unifying trick: ClusterIP isn’t really the third type — it’s the base type, and the default if you don’t specify one. A NodePort service is a ClusterIP plus an open port on every node. A LoadBalancer is a NodePort plus a cloud load balancer in front. Look back at the kubectl get services outputs above: every service we created had a CLUSTER-IP, whatever its type. It’s one mechanism, wrapped in progressively more public layers.
Wrapping up
The three Service types, from most private to most public:
- ClusterIP — a stable internal IP and DNS name (
<service>.<namespace>.svc.cluster.local). The default type, for anything that should only be reached by other pods — like databases. - NodePort — ClusterIP, plus the same port (30000–32767) opened on every node. Reachable from outside via any node’s public IP, and kube-proxy forwards the request to the right pod wherever it lives.
- LoadBalancer — NodePort, plus a real cloud load balancer with its own stable public IP. The production front door — just remember it’s a separately billed resource that can outlive your cluster if you’re not careful.
And in every case, the service finds its pods the same way a ReplicaSet does: labels.
When you’re done, clean up — and this time it costs money if you don’t:
kubectl delete service nginx-loadbalancer db
kubectl delete pod nginx postgres
Then destroy the cluster in the DigitalOcean control panel, and double-check the Load Balancers page is empty.
One question is left hanging: with LoadBalancer, every service you expose costs you a load balancer. Ten public services, ten LBs, ten bills? That can’t be how real clusters work — and it isn’t. In Part 4 we’ll look at Ingress: how to put many services behind a single load balancer, with routing by domain and path.