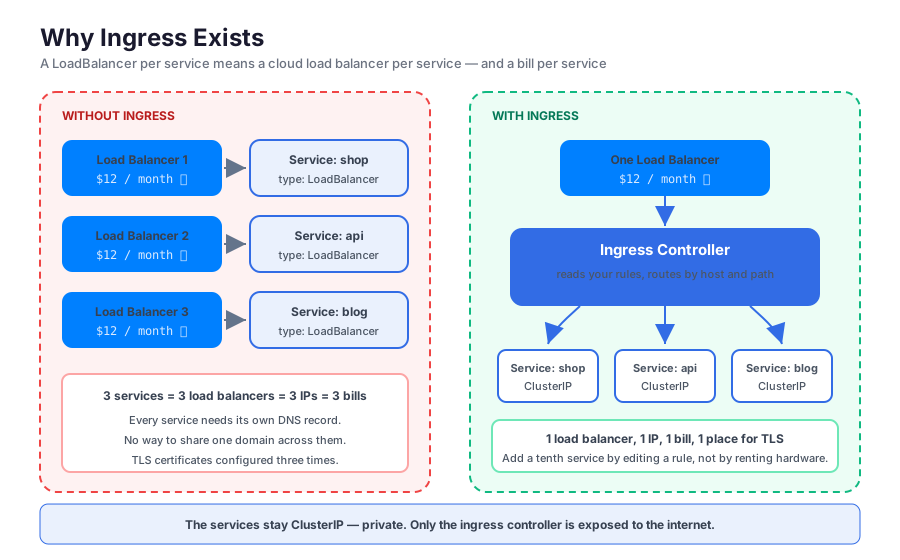
In Part 3 We got nginx onto the internet with a LoadBalancer service, and it worked cleanly — one clean public IP, no weird ports. But then the arithmetic showed up: a LoadBalancer service asks your cloud provider for a real load balancer, and cloud load balancers cost money. Ten public services means ten load balancers, ten IPs, and ten bills.
That’s not how real clusters work. Real clusters put one load balancer at the edge and let something inside the cluster decide where each request should go — based on the domain it was sent to and the path it asked for. That something is an Ingress, and this post is about it: what it is, what it isn’t, and how to actually set one up.
1. Why a Service can’t do this
We already have Services, and a Service already load balances across pods. Why can’t a Service just look at the URL and pick a backend?
Because a Service works at the wrong level. As we saw in Part 3, kube-proxy routes connections — it deals in IP addresses and port numbers. When a TCP connection arrives on port 80, kube-proxy hands it to one of the matching pods and gets out of the way. It never looks at the bytes flowing through. And the hostname you typed (shop.example.com) and the path you asked for (/checkout) aren’t in the IP packet at all — they live inside the HTTP request, in the Host header and the request line.
To route on those, something has to actually parse the HTTP request. That’s a different job — it’s what nginx, HAProxy, and every reverse proxy on earth do. So Kubernetes’ answer is essentially: “run a reverse proxy in the cluster, and let me configure it for you.” That’s an Ingress.
If you’ve seen the phrase “layer 4 vs layer 7”, this is it in practice. A Service is layer 4 (TCP: IPs and ports). An Ingress is layer 7 (HTTP: hostnames, paths, headers, TLS). Layer 7 costs more CPU — someone has to parse every request — but it can make decisions layer 4 can’t.
2. The most important thing about Ingress
An Ingress is only a set of rules. It’s a YAML object you apply, exactly like a Pod or a Service, and it says things like “requests for shop.example.com/one should go to the app-one service.” The API server stores it in etcd, kubectl get ingress shows it, and nothing happens. No proxy appears. No traffic is routed.
The thing that reads that note and acts on it is a separate program called an ingress controller — and Kubernetes does not ship with one. You install it yourself, and it runs as ordinary pods in your cluster. It watches the API server for Ingress objects, translates their rules into its own configuration, and reloads itself.
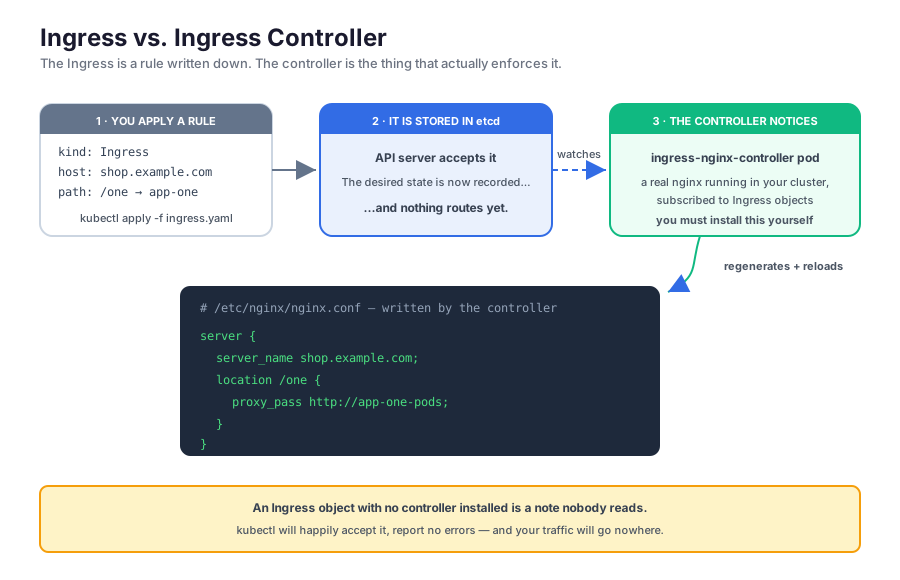
This is the same desired state pattern from Part 1, just with a controller you had to install. You describe what you want; a controller makes reality match. The Deployment controller happens to ship inside Kubernetes; the ingress controller doesn’t.
Because it’s a separate program, you get to choose which one. There are several — Traefik, HAProxy, Kong, and cloud-native ones like the AWS Load Balancer Controller. We’ll use ingress-nginx, the community-maintained controller built on nginx. It’s the most widely deployed, and since it’s just nginx underneath, we can literally look at the config it generates later in this post.
3. Installing the nginx ingress controller
We’re back on the same DigitalOcean cluster from Part 3 (any managed cluster works — GKE, EKS, AKS). If you tore it down at the end of the last post, create a fresh 3-node one and point ~/.kube/config at it again.
The controller isn’t one object — it’s a Deployment, a Service, a ServiceAccount, RBAC rules, ConfigMaps, and more. Applying a dozen manifests by hand would be miserable, so we’ll use Helm: Kubernetes’ package manager. A Helm chart is a bundle of manifests with configurable knobs, and helm install renders the whole bundle and applies it for you. It’s apt install for clusters.
Install Helm (instructions here) — on a mac:
brew install helmThen install the controller:
helm upgrade --install ingress-nginx ingress-nginx \
  --repo https://kubernetes.github.io/ingress-nginx \
  --namespace ingress-nginx --create-namespace
Unpacking that: upgrade --install means “install it, or update it if it’s already there” (handy — you can re-run it safely). The first ingress-nginx is the name we’re giving this installation, the second is the name of the chart in the repo. And --namespace ingress-nginx --create-namespace puts everything in its own namespace.
Notice what’s not in that command: any mention of which cluster to install into. Helm reads ~/.kube/config exactly like kubectl does — same file, same current-context — so it’s already pointed at our DigitalOcean cluster. The --repo URL is unrelated to the cluster; that’s just where Helm downloads the chart from, over plain HTTPS from your laptop. Once downloaded, the chart is rendered into ordinary manifests and applied to the API server using your kubeconfig credentials, which is why helm install is really just a very well-organised kubectl apply.
Namespaces made a cameo in Part 3, in the DNS name db.default.svc.cluster.local. A namespace is simply a folder for objects — a way to group things and keep names from colliding. Everything we’ve created so far went into the default namespace because we never said otherwise. Cluster infrastructure like this conventionally gets its own, which is why most kubectl commands in this section carry a -n ingress-nginx flag: without it, kubectl looks in default and finds nothing.
Watch it come up:
kubectl get pods -n ingress-nginxNAME READY STATUS RESTARTS AGE
ingress-nginx-controller-7d4b9c8f6d-x2vlq 1/1 Running 0 45sThat’s it. That single pod is nginx — a real, ordinary nginx, running in your cluster, that happens to rewrite its own config whenever you create an Ingress.
Now the interesting part:
kubectl get services -n ingress-nginxNAME TYPE CLUSTER-IP EXTERNAL-IP PORT(S) AGE
ingress-nginx-controller LoadBalancer 10.245.101.44 138.197.231.12 80:31021/TCP,443:30513/TCP 2m
ingress-nginx-controller-admission ClusterIP 10.245.18.7 <none> 443/TCP 2mLook at the first line: type: LoadBalancer, with a real EXTERNAL-IP. The chart created exactly the same kind of Service we built by hand in Part 3, and DigitalOcean created a real cloud load balancer for it — give it a minute or two if it still says <pending>.
This is the whole trick. We do use a LoadBalancer service — exactly one, ever — and it points at the ingress controller instead of at an app. Every app we expose from now on is reached through this one IP, and stays a private ClusterIP service itself. The cost of your eleventh public service is zero.
Save that external IP somewhere; we’ll use it for every test below.
export INGRESS_IP=138.197.231.12 # use yoursOne more thing the chart installed:
kubectl get ingressclassNAME CONTROLLER PARAMETERS AGE
nginx k8s.io/ingress-nginx <none> 3mAn IngressClass is how an Ingress says which controller should handle it. Clusters can run more than one controller (nginx for public traffic, something else for internal), so each Ingress names the class it wants. We’ll reference nginx in a moment.
4. Two apps to route between
Routing is boring with one app, so let’s run two. We’ll use hashicorp/http-echo, a tiny image whose only job is to reply with a fixed string — perfect for seeing which backend answered. Save this as apps.yaml:
apiVersion: apps/v1
kind: Deployment
metadata:
  name: app-one
spec:
  replicas: 2
  selector:
    matchLabels:
      app: app-one
  template:
    metadata:
      labels:
        app: app-one
    spec:
      containers:
        - name: http-echo
          image: hashicorp/http-echo
          args: ["-text=hello from APP ONE", "-listen=:5678"]
          ports:
            - containerPort: 5678
---
apiVersion: v1
kind: Service
metadata:
  name: app-one
spec:
  type: ClusterIP
  selector:
    app: app-one
  ports:
    - port: 80
      targetPort: 5678
---
apiVersion: apps/v1
kind: Deployment
metadata:
  name: app-two
spec:
  replicas: 2
  selector:
    matchLabels:
      app: app-two
  template:
    metadata:
      labels:
        app: app-two
    spec:
      containers:
        - name: http-echo
          image: hashicorp/http-echo
          args: ["-text=hello from APP TWO", "-listen=:5678"]
          ports:
            - containerPort: 5678
---
apiVersion: v1
kind: Service
metadata:
  name: app-two
spec:
  type: ClusterIP
  selector:
    app: app-two
  ports:
    - port: 80
      targetPort: 5678
Nothing here is new — Deployments from Part 2, Services from Part 3, glued together with labels as always. Three details worth pointing at:
---separates multiple objects in one YAML file. Four objects, onekubectl apply.type: ClusterIPon both Services — private, exactly what we want; the internet will reach them only through the ingress controller. This line is optional, since ClusterIP is the default when you omittype:, and you’ll often see it left out. It’s worth writing anyway: with an ingress in play, “this service is deliberately not public” is the single most important fact about it.port: 80withtargetPort: 5678— the service answers on 80 and forwards to the container’s actual port. This is why the Ingress rules below can all talk about port 80 without caring what the containers listen on.
kubectl apply -f apps.yaml5. Our first Ingress: routing by path
Now the rules. Save as ingress.yaml:
apiVersion: networking.k8s.io/v1
kind: Ingress
metadata:
  name: demo
spec:
  ingressClassName: nginx
  rules:
    - host: shop.example.com
      http:
        paths:
          - path: /one
            pathType: Prefix
            backend:
              service:
                name: app-one
                port:
                  number: 80
          - path: /two
            pathType: Prefix
            backend:
              service:
                name: app-two
                port:
                  number: 80
The nesting is deeper than anything we’ve written so far, so let’s read it from the outside in:
apiVersion: networking.k8s.io/v1— Ingress lives in the networking API group, not the corev1we’ve used for Pods and Services. Nothing deep here; just the group this object was defined in. Getting it wrong is a common first error.ingressClassName: nginx— the class from the previous section. This is the Ingress saying “the nginx controller owns these rules.” Leave it out and, depending on your setup, nothing may pick up the Ingress at all.rules— a list, one entry per hostname. Within a host,http.pathsis a list of path → backend mappings.backend.service— the destination, given as a service name and port, not an IP. The controller resolves it to actual pod addresses and keeps that list fresh as pods come and go. Same principle as everything else in Kubernetes: names and labels, never hardcoded IPs.pathType: Prefix— how to match the path.Prefixmatches/oneand everything under it (/one/checkout,/one/a/b). The alternative worth knowing isExact, which matches/oneand nothing else. There’s alsoImplementationSpecific, which hands matching over to the controller’s own rules — we’ll need it in a minute.
Apply it:
kubectl apply -f ingress.yaml
kubectl get ingress
NAME CLASS HOSTS ADDRESS PORTS AGE
demo nginx shop.example.com 138.197.231.12 80 30sThat ADDRESS is the controller’s load balancer IP — the controller wrote it back onto the Ingress object once it adopted the rules. If it stays blank for more than a minute, that’s your sign that no controller picked it up (usually a wrong or missing ingressClassName).
Testing without owning the domain
We don’t own shop.example.com, and DNS doesn’t point anywhere useful. But remember why the hostname matters: the controller reads it out of the HTTP Host header. DNS is only how your browser finds an IP — the header is what does the routing. So we can just send the header ourselves:
curl -H "Host: shop.example.com" http://$INGRESS_IP/onehello from APP ONEcurl -H "Host: shop.example.com" http://$INGRESS_IP/twohello from APP TWOTwo apps, two paths, one IP, one load balancer. Try a path with no rule:
curl -H "Host: shop.example.com" http://$INGRESS_IP/nope<html><head><title>404 Not Found</title></head>That 404 comes from nginx itself — no rule matched, so there’s nowhere to send it. (You can set a defaultBackend in the Ingress spec to catch these instead.)
And drop the header entirely:
curl http://$INGRESS_IP/oneYou get a 404 again, because our only rule is scoped to shop.example.com and curl sent Host: 138.197.231.12. Omit host: from a rule and it matches any hostname — useful for a catch-all, dangerous as a default.
If you’d rather use a browser, add a line to your machine’s /etc/hosts file (C:\Windows\System32\drivers\etc\hosts on Windows) so your laptop resolves the fake domain locally:
138.197.231.12 shop.example.com api.example.comThen http://shop.example.com/one works in the browser. For a domain you actually own, the real version of this is one A record per hostname pointing at the ingress IP — and that’s the entire DNS story for a cluster with an ingress: every hostname points at the same address.
6. Routing by host
Path routing is one half. The other is sending different domains to different apps — how one cluster serves shop.example.com and api.example.com from a single IP. It’s just another entry in rules. Add this to ingress.yaml under rules:, at the same indent level as the first - host::
    - host: api.example.com
      http:
        paths:
          - path: /
            pathType: Prefix
            backend:
              service:
                name: app-two
                port:
                  number: 80
kubectl apply -f ingress.yaml
curl -H "Host: api.example.com" http://$INGRESS_IP/anythinghello from APP TWOEvery path under api.example.com now goes to app-two, while shop.example.com keeps its two-way path split. Same IP, same controller, same load balancer.
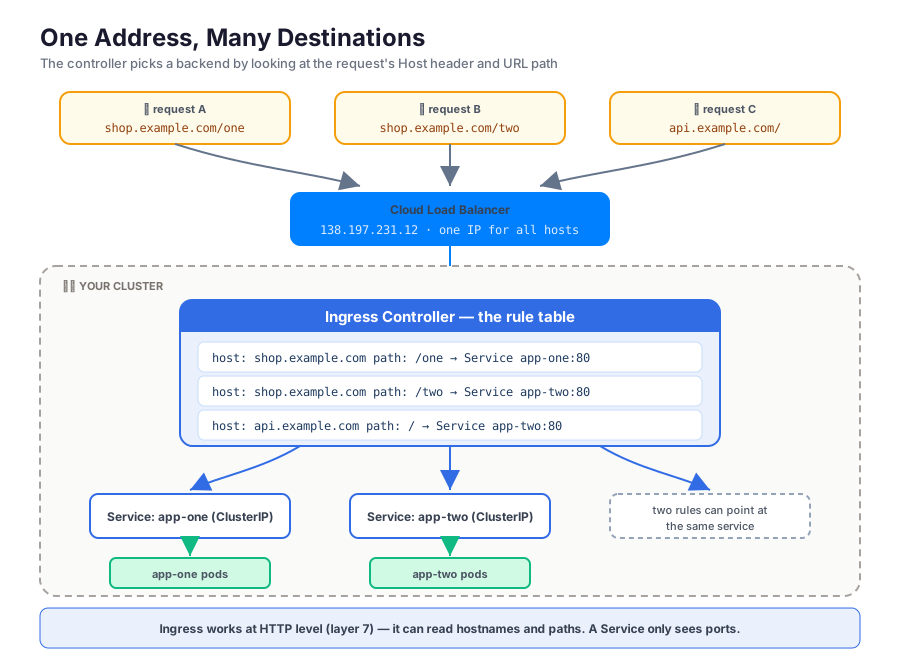
A practical note on organising this: you can put every rule in one big Ingress like we just did, or create a separate Ingress object per app. The controller merges them all into one nginx config either way. Per-app Ingresses are the more common choice in real clusters — each team ships its routing rules alongside its own Deployment and Service, without editing a shared file.
7. What the controller actually did
Since it’s just nginx underneath, we can go and look. kubectl exec runs a command inside a running container — the same idea as docker exec:
kubectl exec -n ingress-nginx deploy/ingress-nginx-controller -- \
  cat /etc/nginx/nginx.conf | grep -A 12 "server_name shop.example.com"
server_name shop.example.com ;
location /two {
set $service_name "app-two";
set $service_port "80";
proxy_pass http://upstream_balancer;
}
location /one {
set $service_name "app-one";
set $service_port "80";
proxy_pass http://upstream_balancer;
}There’s our YAML, compiled into an nginx config. This is the whole flow, demystified: you wrote a rule, a controller translated it into server and location blocks, and reloaded nginx. If you’ve ever hand-written an nginx reverse proxy, you’ve done this job manually — the controller does it every time a pod moves.
Wrapping up
The shape of it:
- A Service routes by IP and port (layer 4). It can’t see hostnames or URLs, so it can’t route on them.
- An Ingress is HTTP routing rules (layer 7) — by host, by path — stored in etcd. On its own it does nothing.
- An ingress controller is a reverse proxy running as pods in your cluster that watches for Ingress objects and reconfigures itself. Kubernetes doesn’t ship one; you install it. We used ingress-nginx via Helm.
- The controller is exposed with one LoadBalancer service. That’s the single cloud load balancer for the whole cluster, and every app behind it stays a private ClusterIP service.
Time to clean up — and as in Part 3, this one costs money if you skip it:
kubectl delete ingress demo
kubectl delete -f apps.yaml
helm uninstall ingress-nginx -n ingress-nginx
kubectl delete namespace ingress-nginx
helm uninstall deletes the controller’s Service, which tells DigitalOcean to tear down the load balancer. Destroy the cluster in the control panel afterwards, then check the Load Balancers page is empty — same trap as last time.
Something might be quietly bothering you across these four posts, though. We’ve hardcoded a database password into a pod manifest and a connection string into an environment variable — fine for learning, not fine for anything else. And every one of our pods has been stateless: delete the postgres pod and the data goes with it, which is not what anyone wants from a database. The next two posts take on one each: Part 5 pulls configuration out of your manifests with ConfigMaps and Secrets, and Part 6 gives pods storage that outlives them with volumes, PersistentVolumes, and PersistentVolumeClaims.