Every pod we’ve built across the last five posts has been disposable. For stateless apps that’s a feature — it’s what makes the rolling updates in Part 2 safe. For the Postgres pod we ran in Part 3, it’s a bug.
That pod’s entire contents are lost the moment it’s replaced. Not corrupted — gone, as if nothing had ever been written. And pods get replaced constantly: a node drains, a rollout happens, the scheduler moves things around.
This post fixes that. Volumes give a pod storage that outlives its containers, PersistentVolumes and PersistentVolumeClaims give it storage that outlives the pod entirely, and we’ll provision real disks two ways — by hand on an EC2 box, then on demand from the cloud provider.
1. Watch the data disappear
We’re on a DigitalOcean cluster again, same as Parts 3 and 4 — half of this post needs a real cloud provider with real disks:
kubectl get nodesNAME STATUS ROLES AGE VERSION
pool-l9pri6ike-cd5nq Ready <none> 4m v1.33.1
pool-l9pri6ike-cd5nr Ready <none> 4m v1.33.1
pool-l9pri6ike-cd5ns Ready <none> 4m v1.33.1Same Postgres pod as Part 3. Save it as postgres-pod.yaml:
apiVersion: v1
kind: Pod
metadata:
  name: postgres
  labels:
    app: postgres
spec:
  containers:
    - name: postgres
      image: postgres:16
      env:
        - name: POSTGRES_PASSWORD
          value: "learning-only"
kubectl apply -f postgres-pod.yamlGive it a few seconds, then write some data:
kubectl exec -it postgres -- psql -U postgres -c \
  "CREATE TABLE users (id serial primary key, name text); INSERT INTO users (name) VALUES ('dheeraj');"
kubectl exec -it postgres -- psql -U postgres -c "SELECT * FROM users;" id | name
----+---------
1 | dheeraj
(1 row)A real table with a real row in it. Now simulate the most ordinary event in a cluster — the pod goes away and comes back:
kubectl delete pod postgres
kubectl apply -f postgres-pod.yaml
kubectl exec -it postgres -- psql -U postgres -c "SELECT * FROM users;"
ERROR: relation "users" does not existNot an empty table. No table. The database initialised itself from scratch, because as far as it can tell it has never run before.
2. Why the container’s filesystem doesn’t count
The reason explains everything that follows.
A container image is a stack of read-only layers — that’s what all those COPY and RUN lines in a Dockerfile produce. Read-only is non-negotiable: it’s what lets fifty containers on a node share one copy of postgres:16 on disk instead of fifty copies.
But a running process needs to write somewhere. So the container runtime adds one thin writable layer on top and unions the whole stack into what looks like a normal filesystem. Every file Postgres creates under /var/lib/postgresql/data lands in that top layer.
And that layer belongs to the container, not to anything more durable. Delete the container, the layer is discarded with it. Nothing was lost or broken — the writable layer did exactly what it’s designed to do, which is to be temporary.
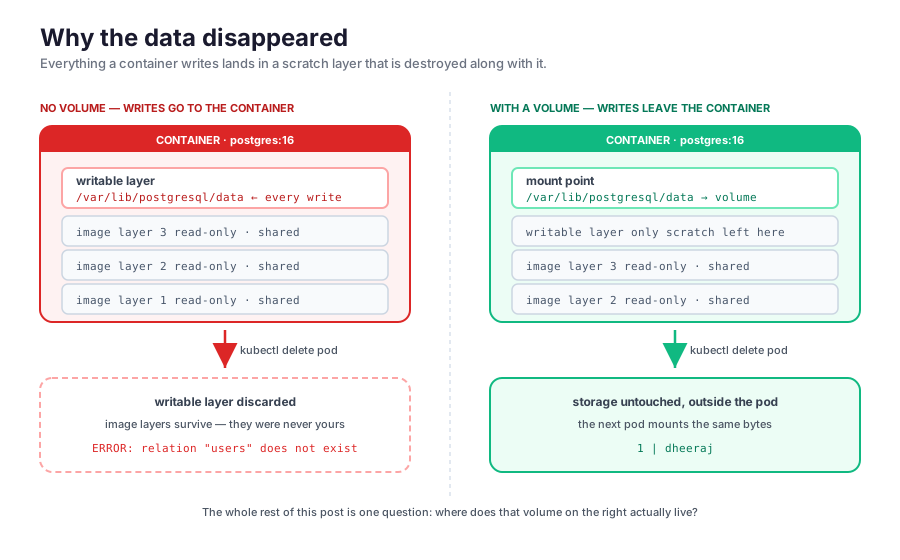
So the fix has a shape: we need a directory inside the container that isn’t part of that layer stack — a path the kubelet mounts in from somewhere else, so writes land on storage the container doesn’t own and can’t take down with it. That’s a volume, and everything else in this post is a question of where the volume’s bytes actually live.
3. emptyDir: a shelf that lives as long as the pod
The simplest volume type. emptyDir is a directory the kubelet creates on the node when the pod is scheduled and deletes when the pod is removed. Save as emptydir.yaml:
apiVersion: v1
kind: Pod
metadata:
  name: scratch
spec:
  containers:
    - name: writer
      image: busybox
      command: ["sh", "-c", "sleep 3600"]
      volumeMounts:
        - name: cache
          mountPath: /data
  volumes:
    - name: cache
      emptyDir: {}
That two-part structure should look familiar — it’s exactly what we used for Secret mounts in Part 5. volumes at pod level says what the volume is; volumeMounts inside a container says where it appears. The name is what ties the two together, and it’s scoped to this pod — nothing else in the cluster cares about it.
kubectl apply -f emptydir.yaml
kubectl exec scratch -- sh -c "echo hello > /data/note.txt"
kubectl exec scratch -- cat /data/note.txthelloNow kill the container without killing the pod. busybox runs one process; kill it and the kubelet restarts the container in place:
kubectl exec scratch -- killall sleep
kubectl get pod scratch
NAME READY STATUS RESTARTS AGE
scratch 1/1 Running 1 (12s ago) 1mRESTARTS 1 — new container, same pod. And the file?
kubectl exec scratch -- cat /data/note.txthelloSurvived. That’s the whole value of emptyDir: it decouples storage from the container lifecycle. But now delete the pod and recreate it, and /data is empty again — because the pod is what the directory was tied to.
So emptyDir is for scratch space, on-disk caches, and — most commonly — a shared scratchpad between two containers in the same pod, where one writes and a sidecar reads. Not for anything you’d miss.
hostPath, and why it isn’t the answer either
The obvious next thought: mount a real directory from the node.
  volumes:
    - name: data
      hostPath:
        path: /mnt/data
        type: DirectoryOrCreate
This does survive pod deletion — the files are on the node’s actual disk. It fails on a different guarantee: the pod isn’t promised to come back to the same node. Our cluster has three. A pod writes to /mnt/data on node A, gets rescheduled to node B after a drain, and finds an empty directory. The data isn’t gone, it’s on a machine the pod is no longer on — and the app sees an empty directory rather than an error. If node A is replaced during an upgrade, it is gone.
hostPath is also a serious security hole — a pod that can mount / on the node can read every other pod’s files and the kubelet’s credentials — which is why most clusters block it by policy.
It has legitimate uses: node-level agents that are supposed to read the host, like a log shipper reading /var/log or a monitoring agent reading /proc, typically running as a DaemonSet pinned to every node. For application data, no.
The lesson generalises: storage that lives on a node is only as durable as that node. For data that must survive, the bytes have to live somewhere the whole cluster can reach — a network filesystem, or a cloud disk that can be detached from one machine and attached to another. So let’s get one.
4. PersistentVolume and PersistentVolumeClaim
Before we provision anything, the two objects — because they confuse people, and the confusion is entirely about who is meant to write which one.
A PersistentVolume (PV) represents an actual piece of storage that exists: an NFS export, a cloud disk. It records where the storage is, how big it is, and how it may be mounted. It’s a cluster-scoped object — it doesn’t belong to a namespace, because a disk doesn’t belong to a namespace.
A PersistentVolumeClaim (PVC) is a request for storage: “I want 10Gi that I can write to.” It’s namespaced, and it lives next to the app that needs it.
Kubernetes then binds them: it finds a PV that satisfies the claim, and marries the two exclusively and one-to-one. Your pod never mentions a PV. It mounts the claim.
The reason for the split is the same one behind ConfigMaps in Part 5 — keep environment-specific facts out of the app’s manifests. It’s a coat check. You hand over your coat and get a numbered ticket; the ticket doesn’t say which hook your coat is on, and you don’t care. The app team writes a PVC saying “10Gi, read-write” and mounts it. Whoever runs the cluster decides whether that’s an NFS export in a rack or a volume on DigitalOcean, and can change the answer without touching the app’s Deployment.
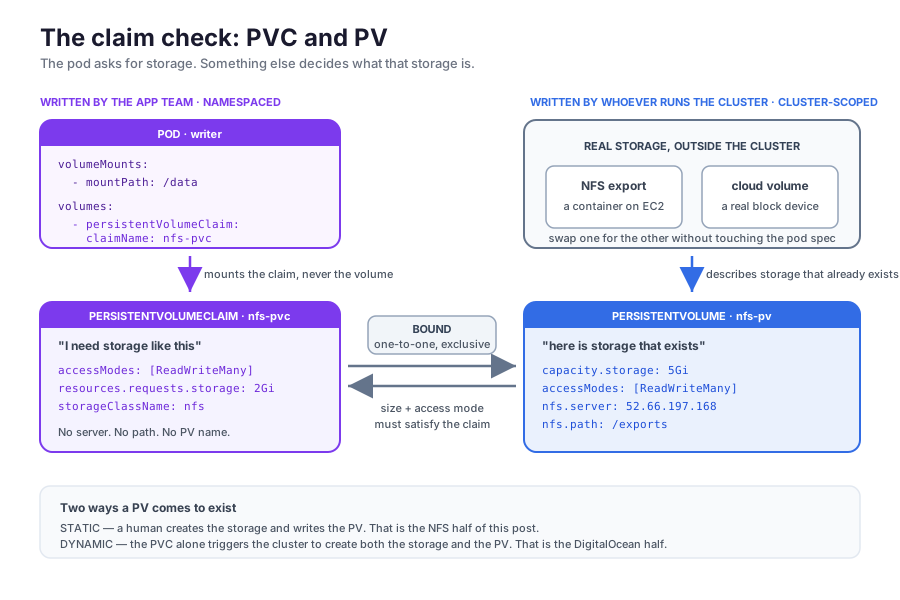
There are two ways a PV comes into existence, and this post does both:
- Static provisioning — a human creates the storage and writes a PV object describing it. That’s sections 5 and 6, with NFS.
- Dynamic provisioning — a PVC alone triggers the cluster to create the storage on demand. That’s section 8, with DigitalOcean block storage.
5. An NFS server on EC2, with Docker Compose
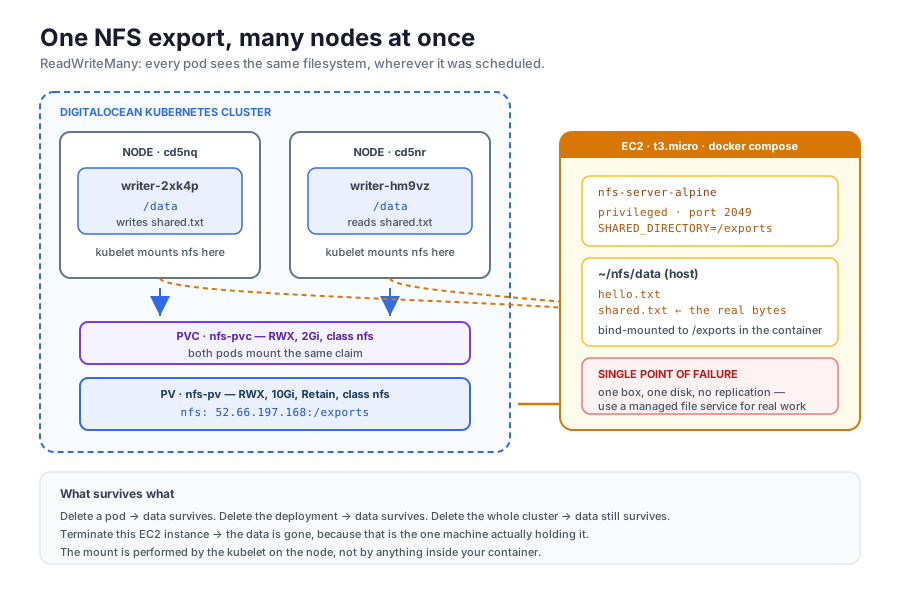
NFS is the oldest network filesystem still in daily use, and it’s the right teaching tool here for one reason: it’s the simplest storage that many pods on many nodes can write to at once. Cloud block storage — which we’ll get to — can’t do that.
Launch an EC2 instance: Ubuntu, t3.micro, in the same region as your cluster. Note its private IP if it can route to your nodes, otherwise the public one.
On the security group: NFS listens on port 2049 and, in the configuration below, does no authentication worth the name — anyone who can reach the port can read and write your files. Allow 2049 only from your cluster’s node IPs, never
0.0.0.0/0. This box is a learning setup, not a design to copy into production.
SSH in and install Docker:
curl -fsSL https://get.docker.com | sudo sh
sudo usermod -aG docker $USER && newgrp docker
Make a directory for the server and the data it will hold:
mkdir -p ~/nfs/data && cd ~/nfsNow docker-compose.yml:
services:
  nfs-server:
    image: itsthenetwork/nfs-server-alpine:latest
    container_name: nfs-server
    privileged: true
    environment:
      SHARED_DIRECTORY: /exports
    volumes:
      - ./data:/exports:rw
    ports:
      - "2049:2049"
    restart: unless-stopped
Four lines in there are doing real work:
privileged: true— the container has to callmountand talk to the kernel’s NFS server, which an unprivileged container can’t.SHARED_DIRECTORY: /exports— the path inside the container to export. The bind mount maps it to~/nfs/dataon the host, which is where the bytes actually land../data:/exports:rw— a relative bind mount, so the data sits next to the compose file rather than somewhere in/srv. Read-write, which the server needs.ports: 2049— this image serves NFSv4 only, which is a single TCP port. NFSv3 would need111and the mountd ports too.
docker compose up -d
docker compose logs nfs-server
nfs-server | Writing SHARED_DIRECTORY to /etc/exports file
nfs-server | The following directory has been exported:
nfs-server | /exports *(rw,fsid=0,async,no_subtree_check,no_auth_nlm,insecure,no_root_squash)
nfs-server | Starting NFS in the background...
nfs-server | Serving /exports/exports is the path the server is serving, and it’s what the PV will point at in the next section. If you ever need to check it again:
docker compose exec nfs-server cat /etc/exportsNow drop a file in. Write it on the host:
echo "written on the nfs server" > ~/nfs/data/hello.txtAnd verify the container sees it, which confirms the bind mount is wired up correctly:
docker compose exec nfs-server cat /exports/hello.txtwritten on the nfs serverOne file, two paths: ~/nfs/data on the host, /exports inside the container, and the same bytes either way. That’s also why the container is disposable — docker compose down and back up loses nothing, since the data lives on the host.
What NFS on one EC2 box gives you. The data survives any pod, any node, and the cluster itself. What it doesn’t survive is this instance: one box, one disk, no replication, and every pod’s writes going through it. In production you’d use a managed file service — EFS on AWS, or DigitalOcean’s own NFS shares — which handles the replication. The Kubernetes objects are identical either way, which is why running it by hand is worth doing once.
6. Static provisioning: writing the PV by hand
Now the PV that points at that export. Save as nfs-pv.yaml:
apiVersion: v1
kind: PersistentVolume
metadata:
  name: nfs-pv
spec:
  capacity:
    storage: 10Gi
  accessModes:
    - ReadWriteMany
  persistentVolumeReclaimPolicy: Retain
  storageClassName: nfs
  nfs:
    server: "52.66.197.168"
    path: "/exports"
Field by field, because every one of these matters:
capacity.storage: 10Gi— for NFS this number is not enforced. Nothing stops a pod writing 50Gi to that export. It’s a label used for matching claims against PVs, nothing more. (For a real block device it’s the actual disk size, so the quirk is specific to network filesystems.)accessModes: [ReadWriteMany]— many nodes may mount this read-write at the same time, which NFS supports. Section 7 has the full table.persistentVolumeReclaimPolicy: Retain— when the claim is deleted, keep the data. The alternative,Delete, wipes it.storageClassName: nfs— there is no StorageClass object callednfs, and there doesn’t need to be. Here the name is just a label that groups PVs: a claim asking for classnfswill only bind to a PV offering classnfs. What matters is that the two agree. Its real job is defensive — see below.nfs.server/nfs.path— your EC2 instance’s IP, and the path the server exports, which section 5 printed as/exports.
The storageClassName deserves one more sentence, because leaving it out is the mistake that actually costs time. A PVC that omits the field entirely gets the cluster’s default StorageClass — and DigitalOcean ships one. So an unlabelled claim quietly provisions a brand new cloud disk instead of binding to your NFS export, and everything appears to work until you notice the file you wrote on EC2 isn’t there. Naming a class on both objects rules that out.
kubectl apply -f nfs-pv.yaml
kubectl get pv
NAME CAPACITY ACCESS MODES RECLAIM POLICY STATUS CLAIM STORAGECLASS AGE
nfs-pv 10Gi RWX Retain Available nfs 8sAvailable — the PV exists and nothing has claimed it. Now the claim, as nfs-pvc.yaml:
apiVersion: v1
kind: PersistentVolumeClaim
metadata:
  name: nfs-pvc
spec:
  accessModes:
    - ReadWriteMany
  storageClassName: nfs
  resources:
    requests:
      storage: 2Gi
Notice what the claim does not say: no server address, no path, no mention of nfs-pv by name. It states requirements — a class, an access mode, and a size — and lets the control plane find something that fits.
The matching rule is “at least as good as requested”: a claim for 2Gi binds happily to a 10Gi PV (and the claim then owns the whole 10Gi — the leftover isn’t shared out). A claim for 20Gi would find nothing and sit Pending forever.
kubectl apply -f nfs-pvc.yaml
kubectl get pvc
NAME STATUS VOLUME CAPACITY ACCESS MODES STORAGECLASS AGE
nfs-pvc Bound nfs-pv 10Gi RWX nfs 3skubectl get pvNAME CAPACITY ACCESS MODES RECLAIM POLICY STATUS CLAIM STORAGECLASS AGE
nfs-pv 10Gi RWX Retain Bound default/nfs-pvc nfs 1mBoth sides now name each other, and the PV’s status has moved Available → Bound. That binding is exclusive — no second PVC can bind to nfs-pv, even though NFS could physically handle it. One PV, one claim, always.
Mounting it in a pod
Now mount it. Two replicas, on (probably) different nodes, sharing one claim. Save as nfs-deploy.yaml:
apiVersion: apps/v1
kind: Deployment
metadata:
  name: writer
spec:
  replicas: 2
  selector:
    matchLabels:
      app: writer
  template:
    metadata:
      labels:
        app: writer
    spec:
      containers:
        - name: writer
          image: busybox
          command: ["sh", "-c", "sleep 3600"]
          volumeMounts:
            - name: shared
              mountPath: /data
      volumes:
        - name: shared
          persistentVolumeClaim:
            claimName: nfs-pvc
The volume block is the entire difference from the emptyDir version — persistentVolumeClaim: { claimName: nfs-pvc } instead of emptyDir: {}. The container spec is untouched. That’s the abstraction paying off: the app just mounts a path.
kubectl apply -f nfs-deploy.yaml
kubectl get pods -l app=writer -o wide
NAME READY STATUS RESTARTS AGE NODE
writer-7d4b8c9f5d-2xk4p 1/1 Running 0 20s pool-l9pri6ike-cd5nq
writer-7d4b8c9f5d-hm9vz 1/1 Running 0 20s pool-l9pri6ike-cd5nrTwo pods, two different nodes. First, the file we created on the EC2 box:
kubectl exec writer-7d4b8c9f5d-2xk4p -- cat /data/hello.txtwritten on the nfs serverThe bytes came from an EC2 instance, over the network, into a container. Now have one pod write and the other read:
kubectl exec writer-7d4b8c9f5d-2xk4p -- sh -c "echo 'from pod one' > /data/shared.txt"
kubectl exec writer-7d4b8c9f5d-hm9vz -- cat /data/shared.txt
from pod oneThat’s ReadWriteMany — two pods on two machines, one shared filesystem. Note how straightforward it was, because in section 8 it stops being possible.
And the thing we came for:
kubectl delete pod -l app=writer
kubectl get pods -l app=writer
NAME READY STATUS RESTARTS AGE
writer-7d4b8c9f5d-4bqwn 1/1 Running 0 6s
writer-7d4b8c9f5d-t8jf2 1/1 Running 0 6sBrand new pods, different names, possibly different nodes:
kubectl exec writer-7d4b8c9f5d-4bqwn -- cat /data/shared.txtfrom pod oneWritten by a pod that no longer exists, read by one that didn’t exist when it was written. The data outlived the thing that created it.
When the mount fails
Two failures are common, and both look identical from kubectl get pods:
NAME                      READY   STATUS              RESTARTS   AGE
writer-7d4b8c9f5d-2xk4p   0/1     ContainerCreating   0          2m
Stuck in ContainerCreating — the image is fine, the kubelet just can’t assemble the pod’s filesystem. kubectl describe pod tells you which one it is:
Warning FailedMount kubelet mount.nfs: Connection timed outThat’s the network: the security group doesn’t allow 2049 from that node, or the server IP is wrong, or you used a private IP that doesn’t route.
Warning  FailedMount  kubelet  bad option; for several filesystems (e.g. nfs, cifs)
                               you might need a /sbin/mount.<type> helper program
That’s a missing NFS client on the node. The mount is performed by the kubelet on the node, not by anything inside your container, so the node itself needs nfs-common installed. Most managed node images include it — DigitalOcean’s do — but if yours doesn’t, that’s the error, and a DaemonSet that installs the package on every node is the usual workaround.
Either way, note the shape: kubectl apply accepted all of this without complaint. Same pattern as a bad ConfigMap key in Part 5 — the API server validates that the object is well-formed, and the world not matching it is discovered later, by the kubelet, on a node.
7. Access modes and reclaim policies
Two fields on the PV that decide most of its behaviour. Worth getting precise about.
Access modes
| Mode | Short | Meaning |
|---|---|---|
ReadWriteOnce | RWO | Mounted read-write by a single node |
ReadOnlyMany | ROX | Mounted read-only by many nodes |
ReadWriteMany | RWX | Mounted read-write by many nodes |
ReadWriteOncePod | RWOP | Mounted read-write by a single pod |
The misread is ReadWriteOnce. It does not mean “one pod” — it means one node. Two pods on the same node can both mount an RWO volume read-write; a third pod on a different node cannot. So a two-replica Deployment on an RWO volume works right up until the scheduler spreads the replicas across nodes.
ReadWriteOncePod is the strict version, added because “one node” wasn’t a strong enough guarantee for databases where two writers means corruption.
And a caveat that mirrors the capacity one: access modes aren’t enforced by the storage, they’re matched by the scheduler. They describe what the underlying storage can do. Declaring RWX on a volume that physically can’t do it won’t make it work; it’ll just let Kubernetes schedule pods that then fail to mount.
Reclaim policies
What happens to the storage when the claim is deleted:
Retain— keep everything. The PV moves toReleasedand the data stays put. Safe, and the right default for anything you care about.Delete— delete the underlying storage along with the PV. Standard for dynamically provisioned volumes, and exactly as dangerous as it sounds.
Recycle used to be a third option (rm -rf the contents and put the PV back in the pool). It’s deprecated; ignore any tutorial that uses it.
Retain has one non-obvious consequence. Delete the claim:
kubectl delete pvc nfs-pvc
kubectl get pv
NAME CAPACITY ACCESS MODES RECLAIM POLICY STATUS CLAIM STORAGECLASS AGE
nfs-pv 10Gi RWX Retain Released default/nfs-pvc nfs 22mReleased, not Available — and it will stay that way. The data is safe on the NFS server, but that PV will not accept a new claim, because it still holds a claimRef pointing at a PVC that no longer exists. That’s deliberate: Kubernetes is refusing to hand someone else’s data to the next claimant. To recycle it deliberately, clear the reference:
kubectl patch pv nfs-pv -p '{"spec":{"claimRef": null}}'
kubectl get pv
NAME CAPACITY ACCESS MODES RECLAIM POLICY STATUS CLAIM STORAGECLASS AGE
nfs-pv 10Gi RWX Retain Available nfs 23mBack to Available, old data intact, ready to bind again. Re-apply the PVC and the deployment to continue.
8. Dynamic provisioning: let the cloud do it
Section 5 cost us: launching an instance, installing a package, editing /etc/exports, opening a firewall port, and hand-writing a PV with an IP address in it. As a process every team repeats every time they need a disk, that doesn’t scale — every new app is a ticket, and every PV is a hand-written file waiting to drift out of date.
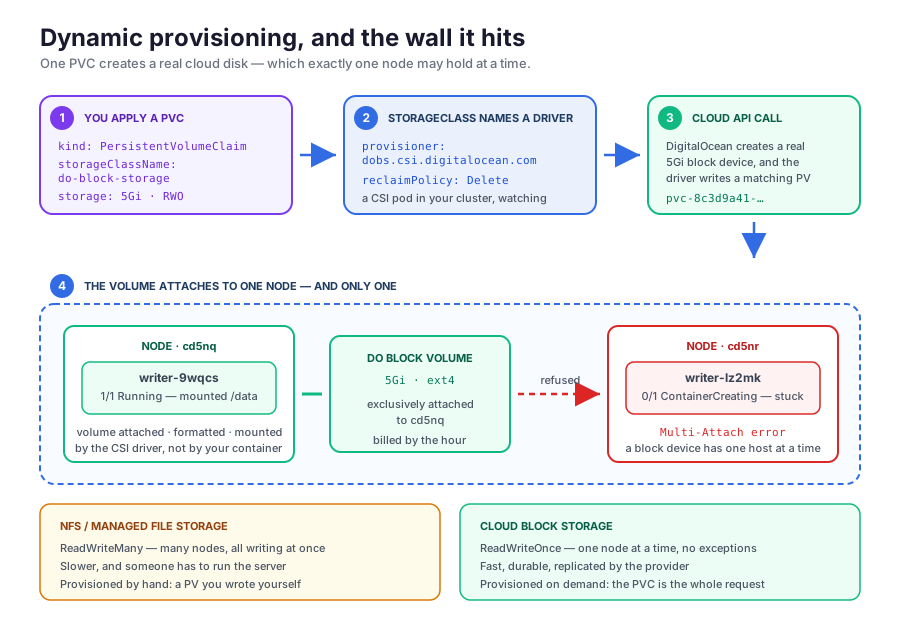
Dynamic provisioning removes the human. You create a PVC; the cluster creates the storage and the PV to match, on the spot. The object that makes it possible is a StorageClass.
kubectl get storageclassNAME PROVISIONER RECLAIMPOLICY VOLUMEBINDINGMODE AGE
do-block-storage (default) dobs.csi.digitalocean.com Delete Immediate 41mDigitalOcean created that for us when the cluster came up; every managed provider ships an equivalent (gp2/gp3 on EKS, standard-rwo on GKE). Read it left to right:
do-block-storage— the name you’d put in a PVC’sstorageClassName.(default)— a PVC that names no storage class gets this one. That’s exactly why section 6’s PV and PVC both named a class of their own.dobs.csi.digitalocean.com— the provisioner: a CSI driver running as pods in your cluster that knows how to call the DigitalOcean API. CSI, the Container Storage Interface, is the plugin standard that lets any vendor implement storage for Kubernetes without patching Kubernetes itself.Delete— the reclaim policy stamped onto every PV this class creates. Delete the claim, the cloud volume is destroyed. Worth reading twice.Immediate— when to create the volume: right when the PVC appears. The alternative,WaitForFirstConsumer, waits until a pod actually needs it, so the volume can be created in the same zone as the node that got scheduled. On a multi-zone cluster that setting is the difference between working and mysteriously unschedulable pods. Check yours withkubectl get sc -o wide.
A claim, and nothing else — do-pvc.yaml:
apiVersion: v1
kind: PersistentVolumeClaim
metadata:
  name: do-pvc
spec:
  accessModes:
    - ReadWriteOnce
  storageClassName: do-block-storage
  resources:
    requests:
      storage: 5Gi
No PV. Nobody SSHed anywhere.
kubectl apply -f do-pvc.yaml
kubectl get pvc do-pvc
NAME STATUS VOLUME CAPACITY ACCESS MODES STORAGECLASS AGE
do-pvc Bound pvc-8c3d9a41-6f2b-4f18-9c0e-1d7a5b2e4c99 5Gi RWO do-block-storage 6skubectl get pvNAME CAPACITY ACCESS MODES RECLAIM POLICY STATUS CLAIM STORAGECLASS AGE
pvc-8c3d9a41-6f2b-4f18-9c0e-1d7a5b2e4c99 5Gi RWO Delete Bound default/do-pvc do-block-storage 6sA PV appeared that we never wrote, with a generated pvc-<uuid> name, already Bound. Open the Volumes page in the DigitalOcean control panel and there’s a real 5Gi block device sitting there, created seconds ago and billed by the hour.
The chain behind that one apply:
- The PVC lands in etcd, unbound, naming
do-block-storage. - The CSI provisioner pod is watching for exactly that and calls DigitalOcean’s API to create a volume.
- It writes a PV describing the new volume and binds it to the claim.
- When a pod using the claim is scheduled, the driver attaches the volume to that node, formats it if it’s blank, and mounts it into the container.
Step 4 is why a cloud volume behaves so differently from NFS, and it’s the constraint of this whole section.
The ReadWriteOnce wall
Try what worked fine over NFS — two replicas sharing the claim. Take nfs-deploy.yaml, point claimName at do-pvc, and apply it:
kubectl get pods -l app=writer -o wideNAME READY STATUS RESTARTS AGE NODE
writer-6b9f7c884d-9wqcs 1/1 Running 0 40s pool-l9pri6ike-cd5nq
writer-6b9f7c884d-lz2mk 0/1 ContainerCreating 0 40s pool-l9pri6ike-cd5nrOne running, one stuck. kubectl describe pod on the stuck one:
Warning  FailedAttachVolume  attachdetach-controller  Multi-Attach error for volume
         "pvc-8c3d9a41-6f2b-4f18-9c0e-1d7a5b2e4c99" Volume is already exclusively
         attached to one node and can't be attached to another
Multi-Attach error. This isn’t a Kubernetes restriction, it’s the storage. A DigitalOcean volume is a block device, and a block device attaches to exactly one machine at a time. Two kernels have no protocol for coordinating writes to the same ext4 filesystem — forcing it produces corruption, not sharing.
So the trade-off, plainly:
- Cloud block storage — fast, durable, replicated, dynamically provisioned.
ReadWriteOnce. One node at a time. - NFS / managed file storage —
ReadWriteMany, many nodes at once, slower, and either you run the server or you pay someone to.
Which means “just add replicas” isn’t available for anything with a block volume. Scale the writer back to one and move on:
kubectl scale deployment writer --replicas=19. Postgres, done properly
Back to the pod we broke in section 1. Save as postgres.yaml:
apiVersion: v1
kind: PersistentVolumeClaim
metadata:
  name: postgres-pvc
spec:
  accessModes:
    - ReadWriteOnce
  storageClassName: do-block-storage
  resources:
    requests:
      storage: 5Gi
---
apiVersion: apps/v1
kind: Deployment
metadata:
  name: postgres
spec:
  replicas: 1
  selector:
    matchLabels:
      app: postgres
  template:
    metadata:
      labels:
        app: postgres
    spec:
      containers:
        - name: postgres
          image: postgres:16
          env:
            - name: POSTGRES_PASSWORD
              value: "learning-only"
            - name: PGDATA
              value: /var/lib/postgresql/data/pgdata
          ports:
            - containerPort: 5432
          volumeMounts:
            - name: data
              mountPath: /var/lib/postgresql/data
      volumes:
        - name: data
          persistentVolumeClaim:
            claimName: postgres-pvc
Two things in there are load-bearing.
replicas: 1, and it must stay 1. Not because Postgres can’t be replicated, but because this isn’t how you replicate it. Two Postgres processes writing to one filesystem corrupt the database. The RWO volume would refuse the second pod across nodes anyway, but don’t rely on that as your safety net — even a rolling update briefly wants two pods, so a real deployment sets strategy: { type: Recreate } to take the old pod down before starting the new one.
PGDATA points to a subdirectory of the mount, not the mount itself. This one needs unpacking, because the obvious manifest — mount the volume at /var/lib/postgresql/data and stop there — produces a pod that never starts.
Three facts collide:
- The CSI driver hands us a raw block device and formats it
ext4before first use. - Every ext4 filesystem has a
lost+founddirectory at its root. It’s created when the filesystem is formatted, and it’s where the repair tool puts files it recovers after a crash. So a brand new, never-written-to volume already has one directory in it. - Postgres refuses to initialise into a directory that already has anything in it, because a non-empty data directory usually means an existing cluster it shouldn’t clobber.
So mounting the volume at /var/lib/postgresql/data means Postgres opens its data directory and finds lost+found sitting there. Not empty, so initdb bails, and the pod crash-loops. initdb spells out both the cause and the fix:
initdb: error: directory "/var/lib/postgresql/data" exists but is not empty
It contains a lost+found directory, perhaps due to it being a mount point.
Using a mount point directly as the data directory is not recommended.
Create a subdirectory under the mount point.
Which is what PGDATA does here. The volume is still mounted at /var/lib/postgresql/data, but Postgres is told to live one level down, in /var/lib/postgresql/data/pgdata — a path that doesn’t exist yet, so Postgres creates it, owns it, and finds it empty. lost+found stays up in the parent where nothing cares about it:
/var/lib/postgresql/data/          ← the volume's root
├── lost+found/                    ← ext4's, ignored
└── pgdata/                        ← PGDATA: Postgres's, and empty on first boot
The same fix from the Kubernetes side is subPath on the mount, which mounts a subdirectory of the volume rather than its root:
          volumeMounts:
            - name: data
              mountPath: /var/lib/postgresql/data
              subPath: pgdata
Now the container sees the volume’s pgdata/ directory as /var/lib/postgresql/data, with lost+found outside its view entirely, so the default PGDATA works untouched. Either approach is fine — pick one, not both. The rule generalises past Postgres: don’t hand a mount point directly to software that expects an empty directory.
kubectl apply -f postgres.yaml
kubectl get pods -l app=postgres
NAME READY STATUS RESTARTS AGE
postgres-5f9c7d6b84-qm2vn 1/1 Running 0 35sWrite the same table as section 1:
kubectl exec deploy/postgres -- psql -U postgres -c \
  "CREATE TABLE users (id serial primary key, name text); INSERT INTO users (name) VALUES ('dheeraj');"
Delete the pod, let the Deployment make a new one, and ask again:
kubectl delete pod -l app=postgres
kubectl rollout status deployment/postgres
kubectl exec deploy/postgres -- psql -U postgres -c "SELECT * FROM users;"
id | name
----+---------
1 | dheeraj
(1 row)Same query, same data, different pod. In section 1 this was an error message.
What happened underneath: the pod died, the CSI driver detached the volume from that node, the scheduler placed a new pod, the driver attached the volume to whichever node that was, and the kubelet mounted it — this time finding an initialised database rather than an empty disk, so Postgres started up and read it. The disk followed the workload.
One caveat. A Deployment plus a PVC is the right shape for a single-instance database. For several stateful pods — a three-node Postgres cluster, a Kafka broker set — a Deployment is wrong: all its pods share one claim, and its pod names are random. The object for that is a StatefulSet, which gives each pod a stable identity (
postgres-0,postgres-1) and its own PVC minted from avolumeClaimTemplate. Same PV and PVC machinery underneath, handed out per-pod.
Wrapping up
Where we landed:
- A container’s writable layer dies with the container. Image layers are read-only and shared; everything your process writes goes into a thin scratch layer that’s discarded on removal. That’s by design.
- A volume is a path mounted in from outside that layer stack.
emptyDirlives as long as the pod (fine for cache and sidecar scratch space);hostPathlives as long as the node, which in a multi-node cluster means your data is on a machine your pod may never see again. - PV and PVC split the job in two. A PersistentVolume is a cluster-scoped description of storage that exists; a PersistentVolumeClaim is a namespaced request for storage. They bind one-to-one and exclusively, and the pod only ever names the claim.
- Static provisioning means a human creates the storage and writes the PV. We ran NFS as a Docker Compose service on EC2 and hand-wrote a PV pointing at it, naming a
storageClassNameon both PV and PVC so the cluster’s default StorageClass couldn’t hijack the claim. ReadWriteOncemeans one node, not one pod. RWX means many nodes at once, which network filesystems can do and block devices fundamentally cannot — henceMulti-Attach errorwhen you try.- Reclaim policy decides what a deleted claim destroys.
Retainkeeps the data and leaves the PVReleaseduntil you clear itsclaimRef;Delete— the default for dynamically provisioned volumes — destroys the cloud disk with the claim. - Dynamic provisioning removes the human. A StorageClass names a CSI driver; a PVC referencing it causes a real cloud volume and a matching PV to be created on demand, attached to whichever node runs the pod.
Cleanup, and read this one carefully, because this post creates things that bill you:
kubectl delete deployment postgres writer
kubectl delete pvc postgres-pvc do-pvc nfs-pvc
kubectl delete pv nfs-pv
kubectl delete pod scratch
Delete the PVCs before you destroy the cluster. The do-block-storage class has reclaim policy Delete, so removing the claim is what tells DigitalOcean to destroy the underlying volume. Tear down the cluster with claims still bound and the volumes can be orphaned — invisible to kubectl, entirely visible on your invoice. Check the Volumes page in the control panel is empty afterwards, the same way we checked Load Balancers in Parts 3 and 4.
Then destroy the cluster. On the EC2 box, docker compose down stops the NFS server but leaves ~/nfs/data on disk — so terminate the instance too, since it’s still running, still costing money, and still holding your data.
Storage was the last of the two loose ends we flagged at the end of Part 4, and both are now tied off: configuration came out of the manifests in Part 5, and data now outlives its pods. Which leaves a question we’ve deliberately dodged since Part 2 — every Deployment in this series has had a replicas count that we picked, by hand, and never changed. Real traffic doesn’t respect a number you typed last Tuesday. In the next post we’ll hand that decision to the cluster with resource requests and limits, the metrics-server, and the Horizontal Pod Autoscaler.